Creating Multiple Points in CATIA V5 using Microsoft Excel
Table of contents
So how does it work?
Within the installation directory of CATIA V5 lurks a Microsoft Excel file which contains some fancy macros pre-configured for you.
The file itself is called: “GSD_PointSplineLoftFromExcel.xls” And can be found (for a typical Windows 7 64-bit installation) in: “C:Program FilesDassault SystemesB26win_b64codecommand” By default the spreadsheet looks something like this:

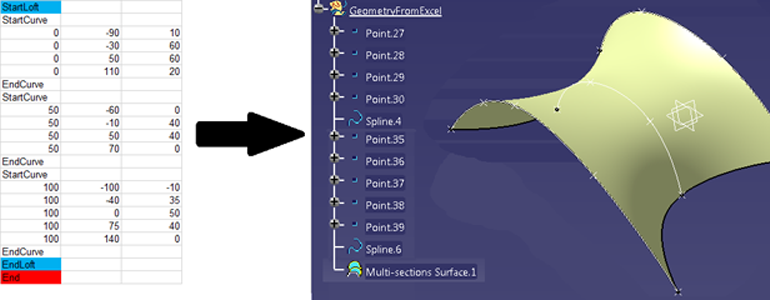
When you run the Macro from within Excel, it reads the data from “Sheet1” and then creates the geometry directly into a new Geometrical Set inside CATIA V5. CATIA V5 must be open with a part file open (new or existing). The Data itself can be inputted to a manner to be able to create multiple points, multiple splines and/or a Multi-Section Surface (Loft). This is how the spreadsheet is broken down:

We can choose to input multiple points as illustrated above. By Specifying points between a “StartCurve” and “EndCurve” field, we can create a spline connecting the points as illustrated below:

Finally we can create a Multi-Section Surface (Loft) using the Splines as illustrated below. The loft is created between the “StartLoft” and “EndLoft” fields. The “End” field specifies end of points/splines/loft:
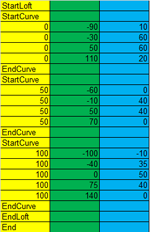
The user can manipulate this data so that additional points can be added or more/less splines etc. The columns are identified as [X,Y,Z] coordinates as described below where Yellow is X, Green is Y and Blue is Z:
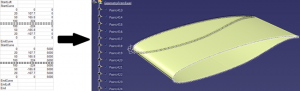
The example below is of an Aerofoil where multiple points are created to define the aerofoil profile (Spline) at both extremities of the aerofoil. There is then a Multi-Section Surface (Loft) between the two Splines:
How to use this functionality
1. Browse to and open GSD_PointSplineLoftFromExcel.xls (Typically in C:Program FilesDassault SystemesBXXwin_b64codecommand) 2. Display the Developer Tab in Excel to access Macros easily:

3. Modify the data in Sheet1 as required:

4. Ensure a new/existing part is open in CATIA V5:

5. Run the macro from the developer tab:

6. Run the macro labelled Feuil1.Main:
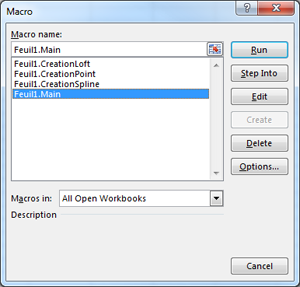
7. Enter value 1, 2 or 3 depending on the output required and press ok:

8. Check your CATIA V5 part file (Value 3 was used in step 7 for this example):

Alternatively watch the video below:
Problems with the Macro?
If you are having problems with the macro in Microsoft Excel and getting the error “Object doesn’t support this property or method”, please try the fix below. Using this Excel based macro as an example, when running the macro the user is issued with the following warning:

To rectify this issue, the user must open up the VBA editor in Microsoft Excel by pressing Alt+F11 or Selecting Visual Basic in the Code ribbon under the Developer Tab:

With Visual Basic now open from inside Excel, look for the line: Set MyPart = CATIA.ActiveEditor.ActiveObject And replace it with the following line: Set MyPart = CATIA.ActiveDocument.Part
Browse our free online resources, including how-to articles, tips and tricks, CATIA software tutorials and much more.

